Fix error code 0xc1800103-0x90002

What is the Media Creation Tool Windows 10 error code 0xc1800103-0x90002?
Media Creation Tool Windows 10 error code 0xc1800103-0x90002 is an error that usually occurs when upgrading to Windows 10 by using Media Creation Tool. During the upgrade, it would appear when the ISO is almost completely downloaded or when it is downloaded but verifying. This may occur due to quirks and bugs within the Media Creation Tool.
You may see the error as “There was a problem starting setup”, “There was a problem running this tool”, or “Something happened – error code 0xc1800103-0x90002.”
How can you fix the Media Creation Tool Windows 10 error code 0xc1800103-0x90002?
Some of the solutions to this error include deleting the Software Distribution and configuring the date and time.
Hold Windows button + R key, then copy and paste into the Run dialogue the commands below:
In each of the folders, click CTRL + A key.
Right-click the highlighted files and then select Delete.
Then, try again.
Window 7
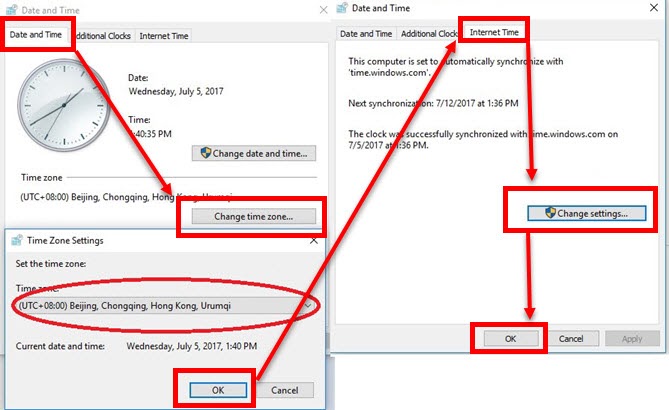
Click the “Windows Start” button, then type in “Date and Time” and press Enter key.
Set your TimeZone correctly.
At the “Internet time” Tab click “Change setting.”
Check the checkbox “Synchronize with an Internet time server.”
In the drop box select, “time.windows.com” then click “Update Now.“
Wait until it synchronizes then click “OK” to apply the settings.
Windows 8
Click Windows Logo key, in the search bar type “Date and Time.“
Then select Settings.
Click Date and Time.
At the “Internet time” Tab click “Change setting.”
Check the checkbox “Synchronize with an Internet time server.”
In the drop box select, “time.windows.com” then click “Update Now.“
Wait until it synchronizes then click “OK” to apply the settings.
After the date and time configuration.
Windows 10
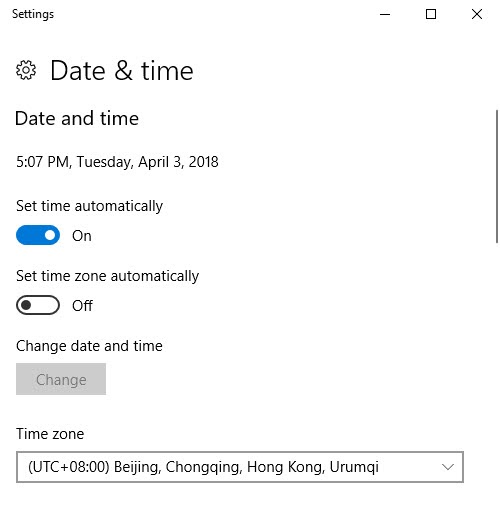
Click the “Windows Start” button, then type in “Date and Time” and press Enter key.
Disable the “Set time zone automatically.”
/
Then set the “Time Zone.”
Enable the “Set time zone automatically.”
Make sure “Set time automatically” is Enabled.
Solution 1. Delete SoftwareDistribution and temporary directory
“Media Creation Tool Windows 10 error code 0xc1800103-0x90002” may be caused by the data inside SoftwareDistribution and the temporary file folder. Try to empty each folder then try to upgrade.
%SystemRoot%\SoftwareDistribution\Download for SoftwareDistribution\Download.
C:$Windows.~BT for Microsoft’s temp directory.

Solution 2. Configure Date and Time
“Media Creation Tool Windows 10 error code 0xc1800103-0x90002” may be caused by a misconfigured date and time. Try to update your time and date, then do an upgrade.


